

Best Way to Bleed a Fish for Better Taste: The Professional Guide
Most anglers think a quick slit to the gills is enough. It isn't. If you leave the blood to pool and the nerves to fire, you're just inviting lactic acid to ruin your dinner. You've spent hours on the water and serious money on gear. Seeing a beautiful fillet turn grey and smell like a bait bucket by Tuesday is a total waste of your effort. You want meat that stays firm, white, and clean for weeks, not days.
We agree that standard catch and toss methods don't cut it for the serious fisherman. This guide reveals the best way to bleed a fish for better taste by using professional Ike Jime techniques. You'll learn the exact steps to eliminate fishy odors and secure sashimi-grade fillets every time you hit the water. We're breaking down the precise anatomical cuts, the science of spinal cord destruction, and why immediate cooling in an 18" x 36" insulated fish bag is the final, non-negotiable step for professional results. It is time to stop settling for mediocre meat and start treating your catch with the respect it deserves.
Key Takeaways
- Blood is the enemy of flavor. Clearing it prevents the rapid bacterial growth and metallic oxidation that causes fishy odors.
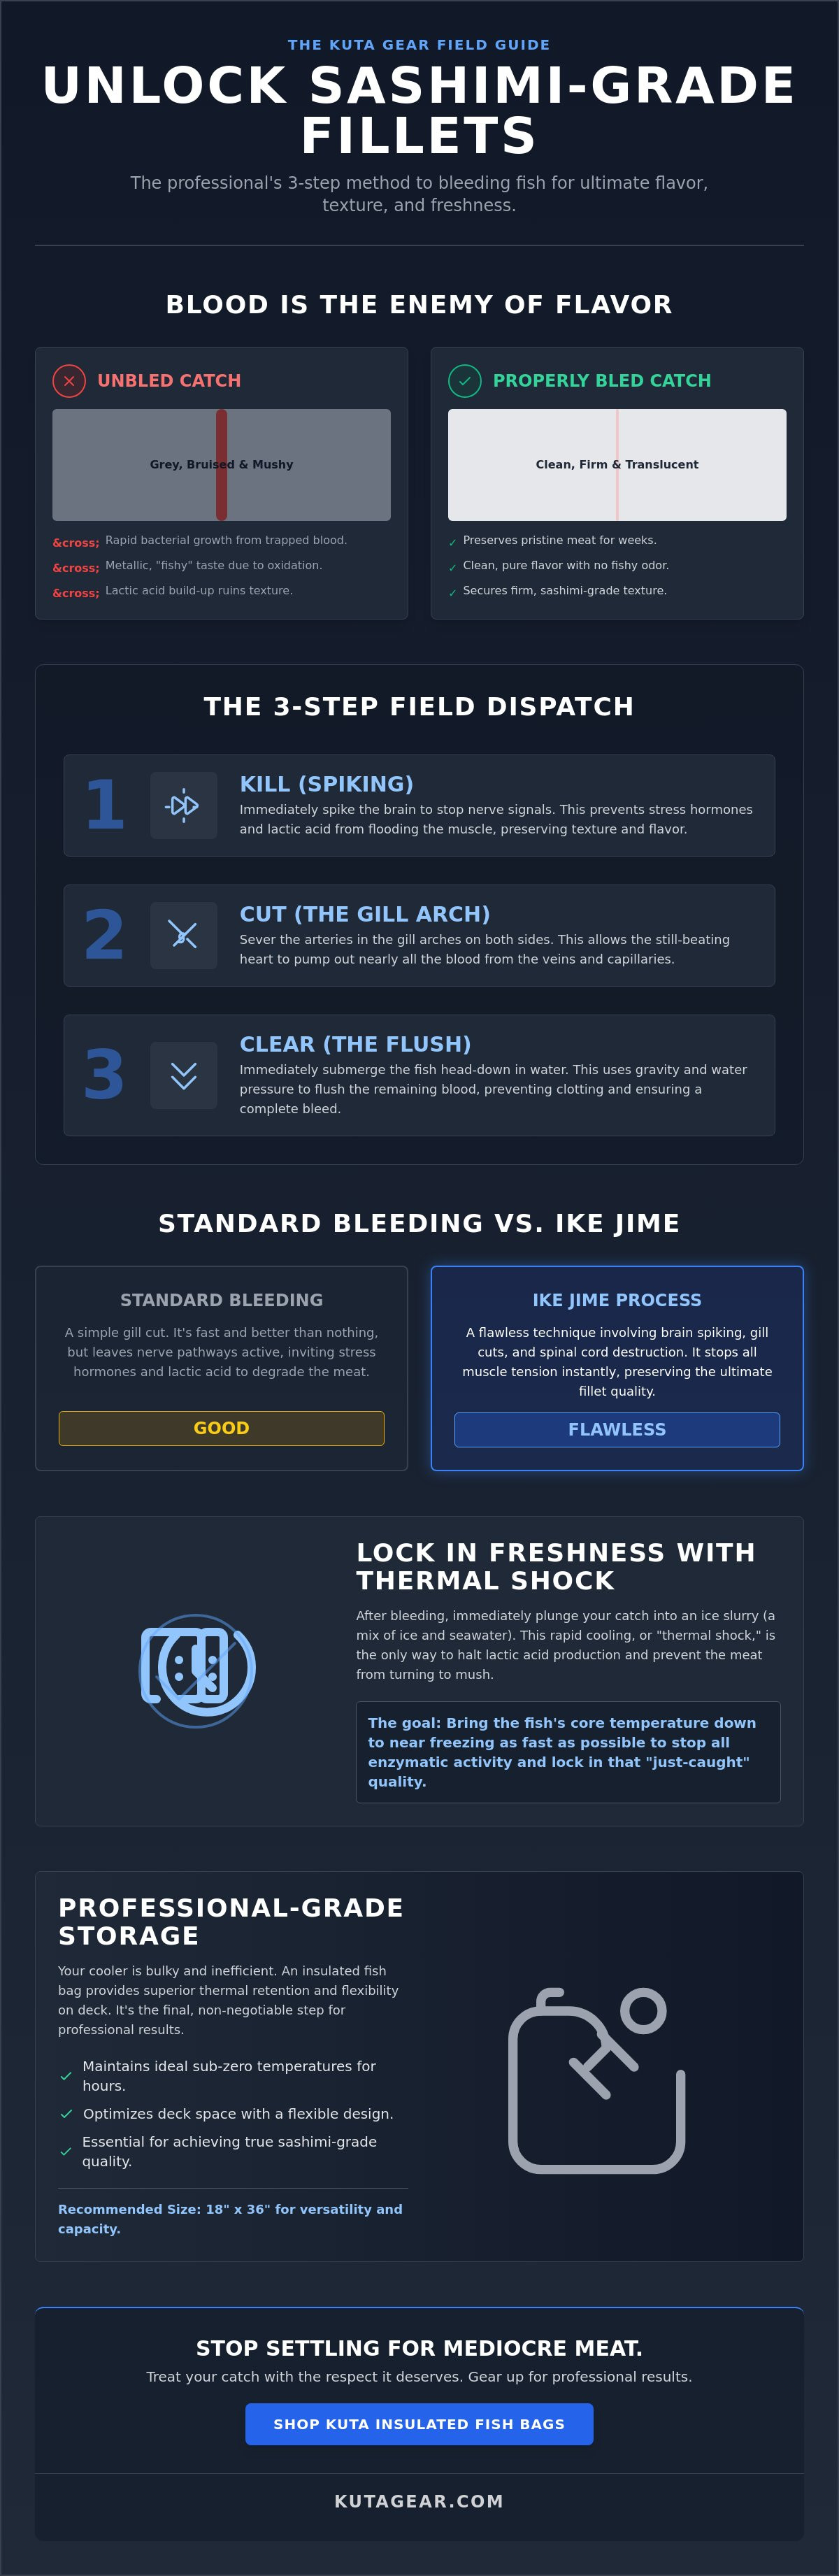
- Discover the best way to bleed a fish for better taste by using a 3-step field dispatch. Kill, cut, and clear to stop muscle tension and preserve texture.
- Learn the difference between standard bleeding and the elite Ike Jime process. One is fast, the other is flawless; both are essential for high-grade meat.
- Master the ice slurry technique to lock in freshness. Thermal shock is the only way to prevent lactic acid from turning your catch to mush.
- Optimize your deck space with an 18" x 36" insulated fish bag. It provides the thermal retention and flexibility needed for professional-grade storage on the water.
The Chemistry of Clean Meat: Why Bleeding is Non-Negotiable
Blood is a biohazard for your catch. It is the primary carrier of bacteria and residual heat. When a fish dies with its veins full, it starts to rot from the inside out. Blood acts as a conductor, keeping the core temperature high even after the fish is out of the water. This heat accelerates spoilage and encourages rapid bacterial growth. Residual blood also leads to rapid oxidation. This is where that metallic, "fishy" flavor comes from. It isn't just about aesthetics. It's about chemistry. Professional anglers know the best way to bleed a fish for better taste starts with immediate evacuation. If you leave the blood in the meat, you're choosing to eat a lower-quality product. Properly bled fish stay fresh longer. They survive the fridge and the freezer without the meat breaking down. It's the difference between a meal you enjoy and one you tolerate.
Lactic Acid and ATP: The Enemies of Flavour
A thrashing fish is a ruined fish. When a fish fights the line, it burns through its Adenosine Triphosphate (ATP) reserves. This exhaustion triggers early rigor mortis. High stress levels also flood the muscle tissue with lactic acid. Lactic acid build-up is the primary cause of mushy fillet texture. By using Ike Jime, you stop the brain signals that cause this chemical cascade. Bleeding the fish immediately flushes these stress compounds out before they can settle into the meat. This prevents the "burnt" meat look often seen in tuna and other hard-fighting pelagics. Finding the best way to bleed a fish for better taste is about mastering the science of meat preservation. You want clean, stable muscle fibers. You don't want a chemical soup.
Visual Comparison: Bled vs. Unbled Fillets
Place a bled fillet next to an unbled one. The difference is undeniable. Bled meat is translucent and clean. Unbled meat looks bruised, grey, and unappealing. The blood line in an unbled fish is thick, dark, and bitter. In a properly processed fish, that line is minimized or nearly invisible. Professional seafood markets won't even look at unbled specimens. They demand the high-clarity meat that only comes from a rapid bleed and immediate cooling in an 18" x 36" insulated fish bag. This bag maintains the sub-zero temperatures needed to stop any remaining enzymatic activity. Rigidity and temperature control are your best friends here. If you want sashimi-grade results, you have to follow the professional standard. Anything else is just amateur hour on the deck.
The 3-Step Field Dispatch: Kill, Cut, and Clear
Tossing a live fish into a bucket to suffocate is the fastest way to ruin a meal. It is lazy. It is also ineffective. For the professional angler, the work starts the moment the fish hits the deck. You need a systematic approach to clear the blood before it has a chance to ruin the meat. This 3-step process is the best way to bleed a fish for better taste because it uses the fish's own biology to do the heavy lifting. By following these steps, you ensure the meat remains pristine and free from the metallic tang of residual blood. Do this for every fish destined for the table. Size doesn't matter; the process remains the same.
Step 1: The Brain Kill (Spiking)
Speed is everything. You must stop the brain signals immediately to prevent muscle tension and the release of stress hormones. Locate the "soft spot" on the fish's head. This is typically found slightly above and behind the eyes. Use a dedicated spike or a heavy, sharp knife. Drive it directly into the brain. You will know you hit the mark when the fins flare out and then immediately relax. The jaw will drop. The thrashing stops. This isn't just humane; it's a technical requirement for high-quality meat. A relaxed fish bleeds more efficiently than a tense one.
Step 2: The Gill Cut
Once the fish is dispatched, you need to open the taps. Lift the gill cover to expose the arches. Identify the thin membrane connecting the gills to the throat. Make a deep, clean cut through the arches on both sides of the fish. Accuracy matters here. You must sever the primary arteries without damaging the heart. Professionals know that the heart needs to continue beating for about 60 seconds to pump the blood out of the veins. If you destroy the heart too early, the blood pools in the extremities. That leads to bruising and localized spoilage. Keep the pump running until the job is done.
Step 3: The Flush
Gravity and water are your final tools. Place the fish head-down in a bucket of seawater or hang it overboard in a mesh bag. Submersion is critical. If the fish is exposed to the air, the blood will clot prematurely, trapping it inside the fillets. Wait until the water runs clear. This usually takes a minute or two depending on the species. Once the blood is purged, the fish is ready for the next phase of preservation. After the flush, immediately transfer your catch to a heavy-duty insulated fish bag to lock in that freshness. This rapid transition from bleeding to cooling is what separates a professional catch from a weekend hobbyist's bucket of waste.
Ike Jime vs. Standard Bleeding: Which Method Wins?
Perfection is a choice. You don't always need it. Standard bleeding is the utilitarian king of the deck. It gets you 90% of the way to a perfect fillet for about 10% of the effort. Ike Jime is the surgical alternative. It involves destroying the spinal cord with a wire to stop all nerve activity instantly. If you are hauling meat to fill the freezer, standard bleeding is the best way to bleed a fish for better taste without losing your mind on a rocking boat. If you are targeting a single trophy Ahi or a massive Snapper for a high-end sashimi platter, you step up your game. It is about matching the method to the mission. Don't waste time on complex surgery when the bite is hot and the cooler is empty.
When to Use the Ike Jime Method
This is for the purists and the raw-bar enthusiasts. Use this when the fish is destined for a sashimi plate. Ike Jime requires specialized tools. You need a dedicated brain spike and a flexible "circuit breaker" wire. The "Shinkei Jime" step is what makes the difference. You run the wire down the spinal canal. This kills the nerves and stops the electrical signals that cause muscles to fire. By killing the nerves, you delay rigor mortis. This keeps the meat soft, sweet, and chemically stable for a longer period. It is a slow, deliberate process. You need a stable platform and a steady hand. On a deck covered in blood and salt spray, this can be a liability. Save it for the high-value trophies that deserve the extra five minutes of work.
Why Standard Bleeding is the Practical Pro Choice
Efficiency wins on the water every time. When the tuna are boiling and the bite is wide open, you don't have ten minutes to perform surgery on a schoolie. Standard bleeding is the practical choice for the working angler. It takes seconds. It requires nothing more than a sharp blade and a place to drain. You get consistent, high-quality results for 99% of cooking applications. Whether you are grilling, searing, or frying, standard bleeding is the best way to bleed a fish for better taste when volume matters. It clears the veins. It stops the metallic oxidation. Once the flush is done, you toss the catch into an 18" x 36" insulated fish bag. This bag maintains the cold chain while you get back to the rods. Don't overcomplicate your day. If you want a clean fillet and a full cooler, stick to the basics and keep your lines in the water.
Thermal Shock and the Ice Slurry: Post-Bleed Catch Care
Bleeding is only half the battle. If your fish sits on a hot deck for more than five minutes, you've already lost. The meat is still warm. Internal enzymes are still active. Bacteria are starting to mobilize. You must induce thermal shock immediately after the flush. This is the best way to bleed a fish for better taste because it freezes the quality at the moment of dispatch. Without rapid cooling, the blood you just cleared is replaced by heat-driven degradation. You want the core temperature to drop instantly. This locks in the texture and prevents the meat from turning into a soft, unappealing mush.
The Science of the Slurry
Air is a poor conductor of cold. Tossing a fish onto a pile of dry ice cubes is a mistake. It creates air pockets and uneven cooling. A slurry is the professional solution. You need a mix of 2 parts ice to 1 part seawater. Saltwater ice melts at a lower temperature than freshwater ice. This creates a sub-zero liquid medium that surrounds the fish entirely. A proper slurry drops the core temperature of your catch 10x faster than air-chilled ice. This "thermal shock" is what secures that sashimi-grade snap in the meat. One critical warning: never use straight freshwater for your slurry. Osmosis will force that freshwater into the cells of the fish, bloating the fillets and diluting the flavor. Keep it salty. Keep it sub-zero.
Managing Your Slurry on the Boat
Consistency is your priority. Your slurry should look like a heavy, thick slush. If it looks like cold water with a few lonely cubes floating on top, it's too warm. You need maximum surface contact. Drain the excess water periodically as the ice melts. Top it off with fresh ice to maintain the density. A dedicated 18" x 36" insulated fish bag holds this slurry better than a leaky plastic bin or a rigid cooler that slides around the deck. The bag conforms to the fish, eliminating air gaps and keeping the cold exactly where it needs to be. It is a utilitarian tool designed for one job: stopping spoilage in its tracks. Don't let your hard work go to waste because of a weak cooling strategy.
High-performance cooling requires the right equipment. To maintain a professional-grade ice slurry all day, order the 18" x 36" Insulated Fish Bag and lock in the flavor of your catch before you even head back to the dock.
Professional Grade Storage: Why Your Bag Choice Matters
A rigid cooler is a liability on a crowded deck. It takes up too much space. It lacks the flexibility to handle large pelagics. If you've mastered the best way to bleed a fish for better taste, don't ruin the result with a cheap plastic box. An insulated fish bag provides superior thermal retention in a compact footprint. It conforms to your catch. This eliminates the air pockets that melt ice and warm up your fillets. The 18" x 36" Insulated Fish Bag is the industry standard for serious anglers who prioritize meat quality over aesthetics. It is built to last. Rugged construction prevents punctures from sharp fins and gaffs. It keeps the mess contained. Your deck stays cleaner. Your fish stays colder. It's that simple.
The Kuta Gear 18" x 36" Advantage
This isn't a luxury item. It's a utilitarian necessity. We designed this bag for the rigors of professional use. It features heavy-duty insulation that maintains sub-zero temperatures for hours. The 18" x 36" dimensions are the "sweet spot" for versatility. It fits everything from reef fish like snapper to mid-sized tuna and mahi. When the trip is over, it is easy to clean. Rinse it out. Dry it. Stow it away. It doesn't eat up your garage space like a 150-quart rotomolded cooler. You get professional performance without the corporate markup or the logistical headache. It is about reliability and preparedness on every trip.
Maximizing Your Bag Performance
Preparation is the difference between success and failure. Pre-chill your bag before you leave the dock. Toss in a sacrificial bag of ice to lower the internal temperature. This ensures your slurry stays at peak performance the moment your first catch hits the deck. Zip the bag tight between catches. Every second the zipper is open, you are losing cold air. Protect your investment and your dinner. Consistency is the hallmark of a pro. Order your 18" x 36" Insulated Fish Bag here and ensure the best way to bleed a fish for better taste ends with a perfect fillet on your plate. Stop settling for mediocre storage and start using gear that mirrors your dedication to the craft.
Secure Sashimi-Grade Results on Every Trip
You have the technical steps. Bleeding is no longer a mystery; it is a professional requirement. We have broken down the chemistry of meat degradation and the mechanics of a perfect purge. You understand that rapid dispatch and immediate cooling are the only ways to stop lactic acid from ruining your fillets. Mastering the best way to bleed a fish for better taste means you are no longer just a fisherman; you are a processor of high-grade protein. Don't let your hard-earned catch suffer from poor field habits. It is time to treat your meat with the respect it deserves.
Consistency requires the right equipment. A plastic bucket or a sliding cooler is a liability on a working deck. Upgrade your catch care with the Kuta Gear 18" x 36" Insulated Fish Bag. This rugged 18" x 36" design is built for harsh marine environments and offers superior insulation for long-duration ice retention. It is trusted by professional anglers who demand catch preservation without the corporate markup. Secure your fillets. Protect your time. Get back on the water and bring home the quality you deserve.
Frequently Asked Questions
Does bleeding a fish really make it taste better?
Yes, it does. Bleeding eliminates the primary source of spoilage and metallic flavors. Blood is a carrier of bacteria and residual heat. By clearing the veins, you prevent the oxidation that leads to that "fishy" smell. This is the best way to bleed a fish for better taste because it preserves the natural sweetness of the meat. You get clean, white fillets that stay fresh for weeks in the fridge.
How long should I let a fish bleed out?
Expect the process to take approximately 1 to 2 minutes. You need to wait until the heart stops pumping and the discharge runs clear. If you pull the fish too early, blood remains trapped in the extremities. This leads to bruising and localized spoilage. Don't rush the flush. Once the water is clear, move the catch immediately to your 18" x 36" insulated fish bag to lock in the quality.
Is it better to bleed fish in a bucket or in the water?
Submersion in water is superior to air-bleeding. Use a bucket of seawater or a mesh bag overboard. Water prevents the blood from clotting prematurely. If blood clots at the wound site, it traps the rest inside the fillets. A liquid medium also helps pull heat away from the core. This is a critical step in the best way to bleed a fish for better taste and ensures a total purge.
What is the most humane way to kill a fish?
Spiking the brain is the most humane method. This technique, known as Ike Jime, stops all neural activity instantly. The fish does not experience the stress of suffocation or the pain of the gill cut. Use a dedicated spike above the eyes. You'll see the fins flare and then relax. This immediate dispatch also prevents the release of stress hormones like cortisol that ruin meat texture and flavor.
Can I bleed a fish after it has already died?
No. You cannot effectively bleed a fish once its heart has stopped. The process relies on the fish's own circulatory system to pump the blood out of the muscle tissue. If the fish is already dead, the blood will clot and pool in the veins. This results in grey, bruised meat and a significantly shorter shelf life. Always dispatch and bleed while the heart is still active to ensure professional results.
Which fish species benefit most from bleeding?
High-activity species with high blood volume benefit the most. This includes pelagics like Tuna, Kingfish, and Mackerel. These species have powerful hearts and warm blood that accelerates spoilage. However, even reef fish like Snapper and Grouper show significant improvement in meat clarity and shelf life. If you intend to eat it, bleed it. There are no exceptions for quality-minded anglers who value their catch on the table.
Do I need special tools to bleed a fish properly?
A sharp knife is the only absolute requirement for a standard bleed. You need to make a clean cut through the gill arches. For those pursuing the Ike Jime method, a dedicated stainless steel spike and a flexible wire are necessary. These tools allow you to destroy the brain and spinal cord. Beyond the cutting tools, a heavy-duty 18" x 36" insulated fish bag is essential for maintaining the cold chain during the process.
Should I gut the fish immediately after bleeding?
No. Focus on bleeding and cooling first. Gutting a fish on a warm deck exposes the cavity to bacteria and allows the internal temperature to rise. Bleed the fish, flush it, and drop it into a sub-zero ice slurry. Wait until the core temperature has dropped before processing. This keeps the meat firm and makes the final cleaning process much cleaner and more efficient once you are back at the dock.

Also in Contact

Portable Fish Storage for Pier Fishing: The Rugged Guide to Catch Preservation

The Best Way to Chill Fish Quickly After Catch: A Professional Guide
